
Refresh Your Beeswax Wrap in 5 Minutes
You use them for everything, and it's starting to show. After a few months of uses and washes, your Beeswax Food Wrap is probably starting to look a little... shabby. The wax might be cracking, rolling at the surface, or feel dry to the touch.
But don't worry! Restoring your wrap to prime condition is simple and only takes a few minutes of hands on time.
How to Refresh your Beeswax Wrap in 5 Minutes (using a hair dryer)
Step 1: Make sure your wrap is clean
Before you begin, you need to make sure our wrap is clean and dry. Rinse thoroughly under COLD water - the colder the better - and scrape away any dried gunk (avocado is the biggest culprit here).
Dry your wrap by patting it with a lint-free or low-lint towel (your oldest dish towel that's been washed to pieces is your wrap's best friend). New or fluffy dish towels will leave lint stuck to your wrap, and we don't want that! Air dry your wrap the rest of the way. This only takes a couple of minutes if you can put in somewhere with good air flow.
Step 2: Warm it up
Next, you'll want to lay your wrap out on a cookie sheet or thoroughly washed surface, and we're going to use a hair dryer to blast every square inch of our wrap. Don't go overboard, you don't want the wax to melt because it will melt right off, and onto the surface you just cleaned for this exercise. Melting the wax also mobilizes the dyes in the fabric, which can start to bleed. So don't do that.
Alternatively, if it's summer or warm where you live, you can leave your wrap sitting in the sun until it warms through. This is what I have done recently here in sunny Singapore.
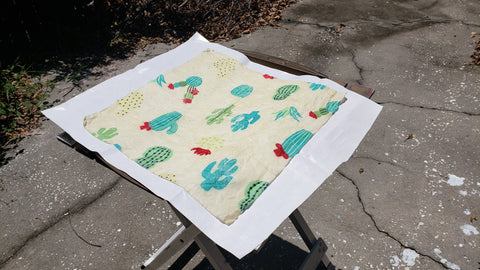
You could also simulate the warmth of the sun using your oven or airfryer on low heat - but be careful to keep your oven at a relatively cool temperature, and to not leave your wrap in for too long. Most ovens won't have a setting for less than 200 degrees, so if you want to try this method, let your oven warm up, then turn it off before sticking your wrap (on a baking paper or freezer paper underneath) inside.
Note: You should never put a beeswax wrap in the microwave.The heat will instantly melt the wax coating, which ruins the wrap's stickiness and shape, and can potentially pose a fire hazard.
Extra Credit Step: If you want to spend a little extra time restoring your wrap, use a refresher wax block to add wax to the worn-out areas of your wrap. After warming your wrap, sandwich it between two waxy sides of baking / freezer paper, and smooth and flatten it out with an iron (set to 140 degrees maximum).
Step 3: Cool it down
Finally, let it cool in place, before folding and storing. If you have your wrap between freezer paper or on a cookie sheet, popping it into the refrigerator is a great way to stiffen the wax before putting it away.
Note: Peel off your wrap from the baking/ freezer paper while it is still warm so that you don't get uneven wax residue on the edges of your refreshed wrap.
Good as new!
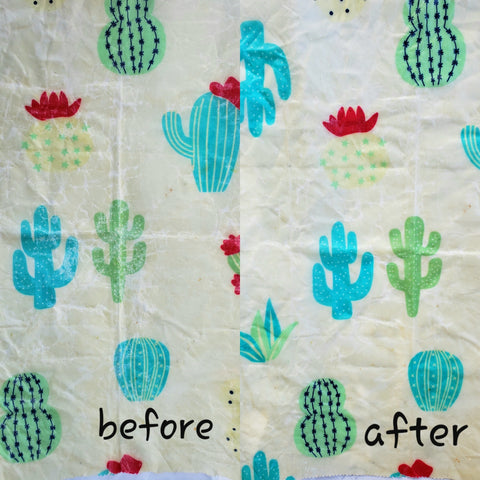
You can see in this before-and-after how the cracks are all sealed again and the wrap surface looks nearly new!
Have you tried refreshing your wrap?! How did it go? Let us know in the comments.
Checkout our BeesWax Wrap making workshop and other links below
How (and why!) to Store Cheese Plastic-Free
How to Clean a Beeswax Food Wrap
How to Fold a Beeswax Wrap into a Pouch
Our Other Workshops and Products
Enquire Now-

Pesto Making Workshops
Learn MoreGet hands-on making authentic Italian pesto using the pestle and mortar, and savour your very own pesto with an included pesto pasta lunch.
-

Urban Farmer Workshops
Learn MoreGrow fresh greens at home with our guided hydroponics building workshop. Learn urban farming, build your own mini farm and harvest your very own veggies.
-

BeesWax Wrap Making Workshops
Learn More:Book our popular, hands-on Beeswax Wrap Workshop! Perfect for corporate team building & schools. Craft reusable batik food wraps & learn sustainable living.


Explore our FARMWALL Commercial Subscription
Enquire Now-

For Schools
Bring sustainable agriculture into the classroom. These space-saving, indoor vertical farms offer students hands-on, biophilic learning experiences while growing fresh microgreens and herbs right at school.
-

For Offices
Elevate office spaces with vibrant, edible greenery. These indoor vertical farms introduce biophilic design to the workplace, enhancing employee well-being while providing fresh, sustainable greens for corporate teams.
-

For Hotels and Restaurants
Deliver a premium farm-to-table experience for hospitality venues. These stunning pest-free vertical farms enhance dining spaces with edible greenery displays while supplying chefs with hyper-local, sustainably grown microgreens and herbs.


